
Formatting your laptop means clearing everything off it to start fresh, similar to cleaning out a cluttered room so you can set it up from scratch. When you format, you remove all files, apps, and settings to reinstall the operating system, giving your device a clean slate.
However, formatting can mean different things. Sometimes it’s just a reset that keeps your files safe. Other times, it’s a full wipe that erases everything, making data recovery impossible even with specialised tools.
Why you might want to format your laptop
There are several good reasons to format your laptop, and it’s not just about making it faster.
1. Boosting speed and performance
Over time, your laptop can get cluttered with leftover files, unused apps, and background processes that slow it down. Formatting wipes all that clean and brings back the speed and smooth experience you had when it was new.
2. Fixing software issues
If you’re experiencing frequent crashes, glitches, or unusual errors, a complete reset or reinstall can help resolve the issue. It clears out any hidden bugs and gives your system a fresh, stable setup.
3. Removing stubborn malware
Some viruses and malware can hide deep in your system, even when antivirus software says everything’s fine. A complete wipe and reinstall is often the best way to remove them entirely and get your laptop secure again.
4. Protecting your data
Thinking of selling or giving away your laptop? A simple delete isn’t enough. Files can still be recovered if they’re not properly wiped. A full format with secure data erasure ensures that your personal information, such as passwords, emails, or work documents, is permanently deleted.
5. Upgrading or changing your operating system
Switching to a different OS (like moving from Windows to Linux) or upgrading to a newer version? A clean install is the safest way to ensure your new system runs properly without any lingering issues from the old one.
Essential preparations before you format your laptop
Formatting your laptop isn’t just about wiping it clean; it also means getting everything ready to avoid headaches later. Skipping the prep work can lead to lost files, licence issues, and hours of extra setup after the reset.
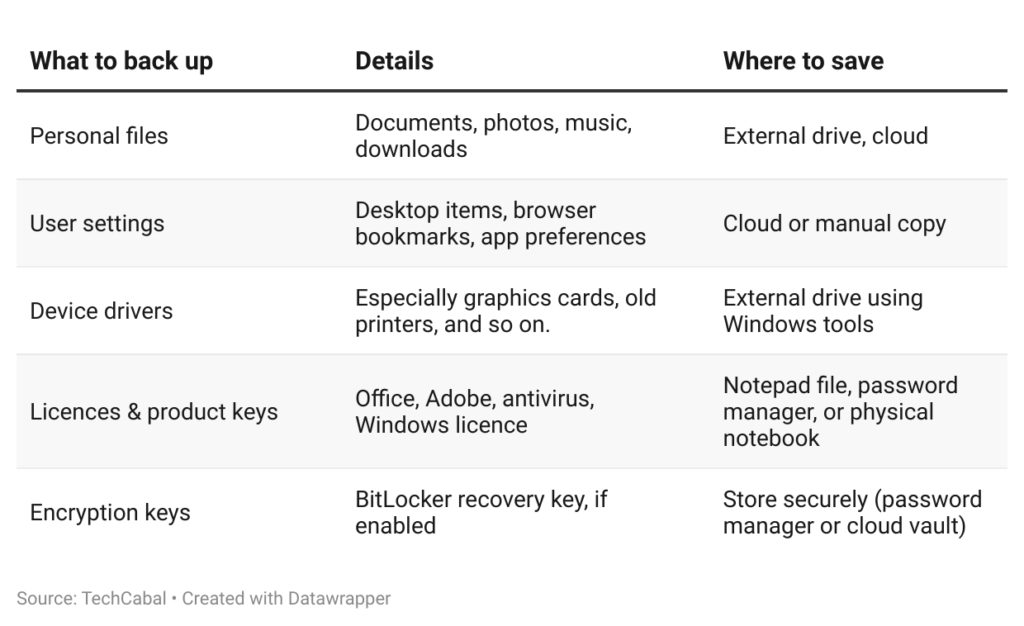
A. Back up everything that matters
Before formatting, ensure that all your important data is safely backed up. Once you wipe your laptop, there’s no going back. You’ll lose everything: photos, work files, apps, settings, even drivers. Here’s how to cover your bases:
1. Save your files
Start with the obvious: your documents, photos, videos, music, and anything in folders like Downloads or Desktop. These are easy to miss but usually contain essential files. Copy them to an external hard drive or upload them to cloud storage, such as Google Drive, iCloud, OneDrive, or Dropbox.
2. Don’t forget your browser and app data
If you use Chrome, Firefox, Safari, or Edge, export your bookmarks and saved passwords, and back up app-specific data, like game saves, templates, or anything you’ve customised.
3. Back up your drivers (yes, it matters)
Some drivers may reinstall automatically after the reset, but not all of them. Especially if you have a gaming laptop, older hardware, or special accessories. Backing up your current drivers saves time and avoids annoying glitches later. On Windows, you can use built-in tools like:
DISM
pnputil
Export-WindowsDriver in PowerShell
These let you export all your current drivers into a folder for safekeeping.
4. Sign out and save your software licences
If you’ve bought any software, like Microsoft Office, Adobe tools, or antivirus programs, sign out before formatting. Some licences are only compatible with one device at a time. Also, keep a record of your product keys. Most Windows 10/11 licences are stored in the system, but it doesn’t hurt to double-check.
5. How to back up: your options
A mix of local and cloud backups is the safest approach. Here’s what to consider:
Windows: Use File History or Backup and Restore for automatic file backups.
Mac: Set up Time Machine with an external drive.
Linux: Use tools like Déjà Dup to back up your home folder and settings.
Pro Tip: Don’t just copy documents; think about your entire setup, including browser bookmarks, app settings, drivers, and licence keys. The more you back up now, the easier it’ll be after the format.
6. Pre-format backup checklist
B. Make a bootable USB for a clean install
To fully reinstall your OS, you’ll need a bootable USB drive (or disc). This helps your laptop load the operating system from scratch, rather than performing a basic reset.
1. For Windows (10 & 11)
Easiest Way: Microsoft’s Media Creation Tool
Download from the Microsoft site
Plug in an 8 GB+ USB
Let the tool handle the rest. It’ll download the OS and create the installer for you.
Advanced Option: Use Command Prompt (Diskpart)If you’re comfortable with commands, you can manually prep a USB using Diskpart and xcopy. This gives you more control, but be careful, mistakes here can wipe the wrong drive.
2. For macOS (Sequoia, Sonoma, etc.)
Use Terminal
Download the full macOS installer from the App Store
Plug in a 16–32GB USB drive
Use createinstallmedia in Terminal to turn it into a bootable installer
Tip: Use Disk Utility first to format the USB properly
Prefer a visual tool?Apps like Disk Drill offer a more straightforward, graphical way to do this, which is great if you’re not into Terminal commands.
3. For Linux (Ubuntu, Fedora, etc.)
Download the correct ISO file from your distro’s website
Use Etcher, Rufus, or UNetbootin to flash it to your USB
Make sure to:
Pick the correct partition scheme (MBR/GPT)
Select the right USB (double-check!)
Disable Fast Startup in Windows if switching OS
4. Don’t forget BIOS/UEFI settings
Even with your bootable USB ready, your laptop might not boot from it right away. You may need to:
Disable Secure Boot
Change the boot order
Turn off Fast Startup
These settings are typically located in your BIOS or UEFI menu and can often cause issues during installation. If your computer doesn’t recognise the USB, check here first.
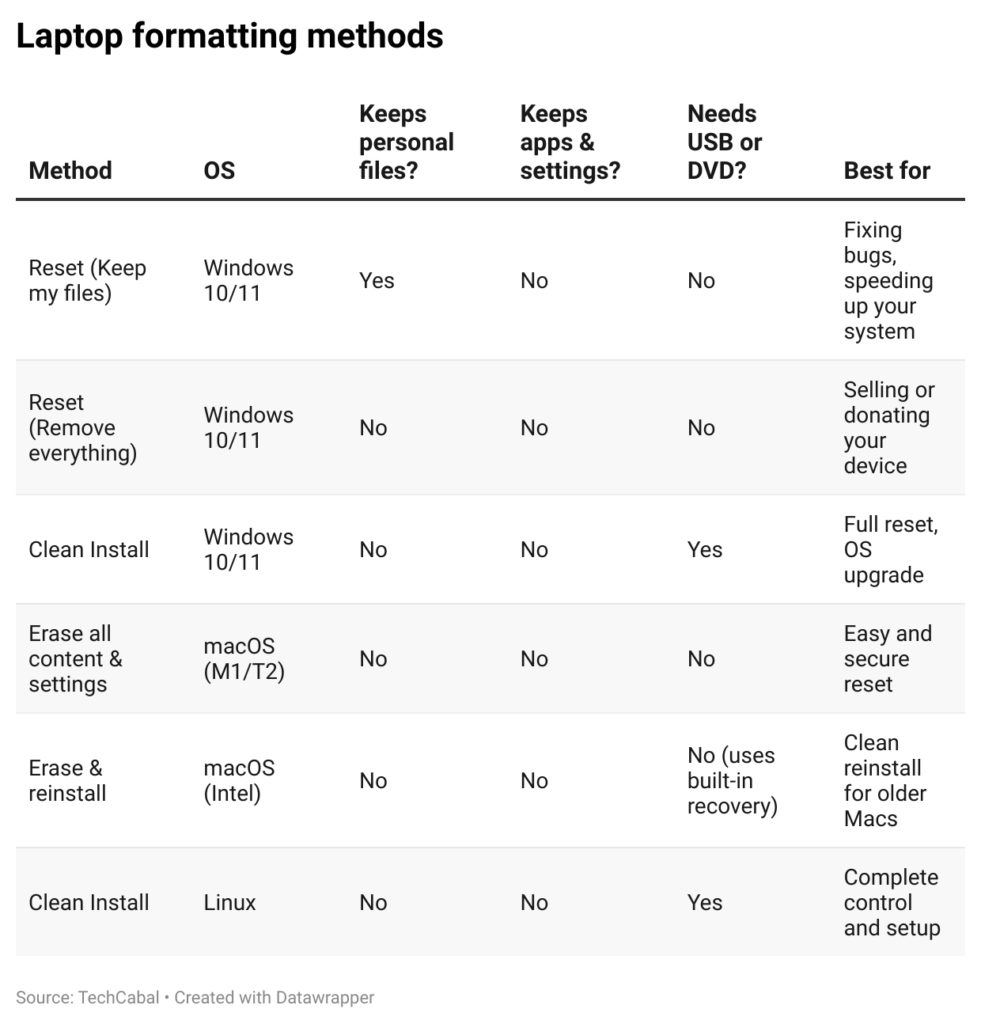
Step-by-step formatting methods
The steps to format your laptop depend on which operating system you’re using. Some methods help you keep your files, while others completely wipe everything. Before you choose, it helps to know what kind of reset you’re looking for: something simple to fix bugs, or a clean slate to start over, or give your laptop to someone else.
Formatting options at a glance
A. How to format a Windows laptop (Windows 10 & 11)
1. Factory Reset (OEM Image)
This resets your laptop to its original factory settings. It brings back all the original apps, drivers, and settings, including the bloatware. It’s useful if your device is under warranty or if you’re returning it.
2. Reset this PC (Built-in Tool)
Go to Settings > System > Recovery and choose Reset this PC. You’ll see two options:
Keep my files: Wipes apps and settings, but keeps your files
Remove everything: Wipes everything
For more security, use the “Clean data” option. It overwrites your files, making them harder to recover; however, note that this doesn’t meet high-level security standards.
You can choose between:
Cloud download: Gets the latest Windows version from Microsoft (needs internet)
Local reinstall: Uses files already on your PC (faster but may not be up to date)
3. Clean Install (Using USB or DVD)
This is the most thorough method for formatting. It wipes the entire drive and installs a fresh copy of Windows. You’ll need:
A bootable USB created using Microsoft’s Media Creation Tool
Access the BIOS to set your USB as the startup drive
Bonus tip: If you plan to change your drive setup (such as converting to GPT), a clean install gives you complete control.
Accessing advanced startup
From Settings: Go to Recovery > Advanced Startup > Restart now
From the login screen: Hold Shift, click Restart
If Windows won’t boot: Interrupt startup twice to trigger automatic repair
From installation media: Boot from USB and click Repair your computer
In the Windows Recovery Environment, you can:
Use System Restore
Run Startup Repair
Uninstall updates
Boot into Safe Mode
Open Command Prompt
B. How to format a Mac laptop
1. Erase all content and settings (Apple Silicon or T2 Chip)
Go to System Settings > General > Transfer or Reset > Erase All Content and Settings.
Sign out of iCloud and Find My
Review what’s being erased, then confirm
The Mac will restart and appear brand new
This method uses hardware-based encryption to wipe your data almost instantly.
2. Erase & reinstall macOS (Intel Macs)
Shut down your Mac
Press Command + R while powering on to enter Recovery Mode
Open Disk Utility, select Macintosh HD, and erase it
Quit Disk Utility and click Reinstall macOS
If you don’t see the reinstall option, make sure you’re connected to the internet.
3. Using Disk Utility for extra control
If you want to reformat external drives or adjust partition settings:
Choose APFS or Mac OS Extended (based on your Mac’s recommendation)
Use GUID Partition Map for newer Macs
Use Security Options on hard drives (HDDs) to securely overwrite data (not available on SSDs)
C. How to format a Linux laptop
Linux gives you the most control. You’ll need a bootable USB and a bit of confidence.
1. Download the ISO
Get your preferred distro from its official site (Ubuntu, Fedora, Linux Mint, etc.)
2. Create a Bootable USB
Use tools like Etcher, Rufus, or UNetbootin to flash the ISO to your USB drive
3. Boot From USB
Plug in your USB drive, turn on the laptop, and press the boot key (typically F12, Esc, or Del). Choose the USB to boot into the installer.
You may need to:
Disable Secure Boot in BIOS
Choose the correct partition setup (MBR or GPT)
4. Start the Install
Once inside the live environment, click the install icon. Follow the prompts:
Pick your language, time zone, and keyboard
Choose how to install: erase everything, or set up partitions manually
Enter user details and start the process
Tip: Manual partitioning is excellent for advanced users who want a separate /home partition or are setting up dual-boot systems.
What to do after formatting your laptop
Once you’ve formatted your laptop, it’ll feel like a blank slate. But to get it fully working, safe, and ready for daily use, there are a few things you need to set up right away.
1. Install your drivers first
After a clean installation, your laptop may not have all the necessary drivers. Some basic components may be included, but others, such as your graphics card, Wi-Fi, or touchpad, may be missing or outdated.
To fix this:
Go to your laptop brand’s official site (like Dell, HP, Lenovo, or Apple).
Find and download the latest drivers for your model and your operating system version.
For Linux, you can use your system’s app centre or driver tools to install what you need (like NVIDIA drivers or codec packs).
If you backed up your drivers before formatting, great, you can restore those now. Just avoid using drivers from a different version of the operating system. That can cause problems. Using the most up-to-date drivers provides better performance and helps avoid unusual glitches.
2. Install only the software you need
Now’s your chance to start fresh. Only install the apps you use, and leave the rest out. This keeps your system light and fast.
Here’s a good starting list:
A browser (Chrome, Firefox, or Edge)
An antivirus tool (like McAfee if you’re on Windows)
A media player (VLC is a solid pick)
An office suite (LibreOffice or Microsoft Office)
If you’re on Windows and used a recovery image:You might notice extra apps or shortcuts you didn’t ask for. This is often called bloatware. It’s best to review your app list and uninstall any unnecessary apps.
For Linux users:Your system probably came with just the basics. You can head to your software centre or enable extra sources (like Flatpak or RPM Fusion) to grab your favourite apps. Some formats, such as MP3 or MP4, may require additional codec packs. Ubuntu, for example, uses a package called ubuntu-restricted-extras for that.
Being intentional here means you avoid clutter that could slow things down later. You also keep your system secure by only installing trusted tools.
3. Run updates and lock down your security
Right after formatting, your system is at its most vulnerable. It hasn’t been patched, and it probably doesn’t have the latest security features turned on. Fix that right away.
First, update everything. Even if your installation media is recent, it is likely to have missed some essential patches.
On Windows, open Settings > Windows Update.
On Linux, run: sudo apt update && sudo apt upgrade -y (for Debian/Ubuntu-based systems).
Windows users should also check:
If encryption is turned on (especially for Windows 11 Home, it’s linked to your Microsoft account).
Use a Microsoft account for enhanced security features, including two-factor authentication and biometric sign-in.
If you have Windows Pro or Enterprise, consider enabling Windows Sandbox. It allows you to open files and test apps in a secure environment without compromising your central system.
On Linux:
Set up display options, such as scaling and HDR (if your screen supports it).
Install power-saving tools like TLP to get better battery life.
Getting your updates and security settings right from the start helps you avoid issues down the road.
4. Final touches to make it yours
Once you’ve handled the basics, you can fine-tune your system to match how you like to work.
Clean as you go: Don’t let your fresh system turn into a mess. Avoid installing random software and be vigilant for anything suspicious.
Personalise it: Change your wallpaper, adjust your dock or taskbar, and tweak your settings to fit your style and workflow.
Tidy up your browser: If you use Firefox, for example, you can turn off things like sponsored content, tracking, or search suggestions. That keeps things clean and distraction-free.
Read more: