
By KURT KLEINER
Although very few general aviation pilots are professional photographers, most of us occasionally shoot a cell phone photo of an interesting sky or terrain feature while we’re flying.
It’s easy to improve the quality of our in-flight photos if we adopt the mindset of an “active” photographer rather than simply snapping photos in passing.
Active photography involves selecting a specific target, then maneuvering and positioning an aircraft to intentionally compose an image using different angles, perspectives, light and shadows, and sky conditions to achieve the best possible photos.

But before we concentrate on improving the quality of our photos, we have to acknowledge that aerial photography inherently presents many additional safety and risk management concerns due to dividing our situational awareness and workload between flying the aircraft and shooting photos.
Environmental hazards should be assessed and mitigated first, especially if we want to shoot photos of landscapes or scenery at low altitude in remote or mountainous areas. These hazards include other traffic, density altitude, mountain turbulence, and confined terrain that may be obscured by clouds.
In addition to complying with 14 CFR 91.119 Minimum Safe Altitudes, an aerial photographer must always consider safety of flight and maintaining aircraft control as the highest priorities over capturing high-quality photos.
Once the risk is managed, it’s time to go for a photo shoot.
First of all, it’s important to know what you want your images to communicate. If it is a human story with an aviation theme for an audience of pilots, it may be appropriate to include the wing or panel in the photo.

But if you are shooting photos of a natural landscape or a specific feature on the ground, there are many ways to eliminate the distraction of wings, wheels, and struts from the shot.
In a high-wing aircraft, you can simply point the camera aft toward your eight o’clock position, and fly at an altitude where you can point the camera down at a 10° to 30° angle.
Another method is to use partial zoom, especially if the target is relatively small, like a house or barn.
If you are flying a low-wing aircraft, the wing may be excluded from the shot by looking forward toward your ten o’clock or flying a wider turn radius that only requires a shallow bank or by using a full side-slip technique.
Unless there is an impressive cloud formation, sunset, or sunrise, do not include excess sky in the top of the image. There are many examples of outstanding aerial photos of landscapes found in coffee-table books that have no airplane parts or sky in the shot.

If you do include a small strip of sky at the top of the frame, try to keep the horizon straight or use the basic editing tool found on most cell phone cameras to correct a tilted horizon.
Before taking off, you may wish to read up on some basic principles of photo composition such as the “rule-of-thirds,” which is a guideline that places your subject in the left or right third of an image, leaving the other two thirds more open. While there are other forms of composition, the rule of thirds generally leads to compelling and well-composed shots.
When using an aircraft as a platform for photos, the composition is constantly changing and is often naturally defined by the geometry of the terrain or patterns of light and shadows. The key is to look at what the camera is seeing and experiment with different flight altitudes and shooting angles to see what produces the best results. It may take some practice to take photos with one steady hand while flying the aircraft with the other, especially if using a slip to keep the wing banked during a fly-by on one heading.

Composition can also be modified and refined by using the basic photo cropping feature after your flight that is available on most smart phone cameras.
Take some time on the ground practicing specific techniques, which will help you develop an eye for composition that can be applied to aerial photography.
Many excellent photos are ruined by the reflection of window glare. Whenever possible, open the window, if it is allowed below a specified airspeed by the aircraft manufacturer. Consider holding the camera two or three inches inside the airplane or wear a wrist loop in case it slips from your grip.
If you cannot open the window, you can often eliminate glare by holding the camera right up against the plexiglass window. Be sure the camera is in a soft padded case or attach a small strip of adhesive moleskin just above the lens to avoid scratching the plexiglass.
Be aware that airframe vibration can cause a photo to be blurred, while tinted glass may distort or diminish the colors of what you are trying to photograph.
The best time of day for capturing rich colors and impressive contrasts between light and shadow is the 15 or 20 minutes immediately after sunrise or just before sunset when the atmosphere filters out green and blue colors and accentuates the red, orange, and yellow tones.

It is usually best to photograph only the sunlit side of a subject from different angles using multiple passes or fly-bys at this time of day rather than shooting photos from all sides while circling.
Look for opportunities to capture contrasting shadows that are cast at different geometric angles.

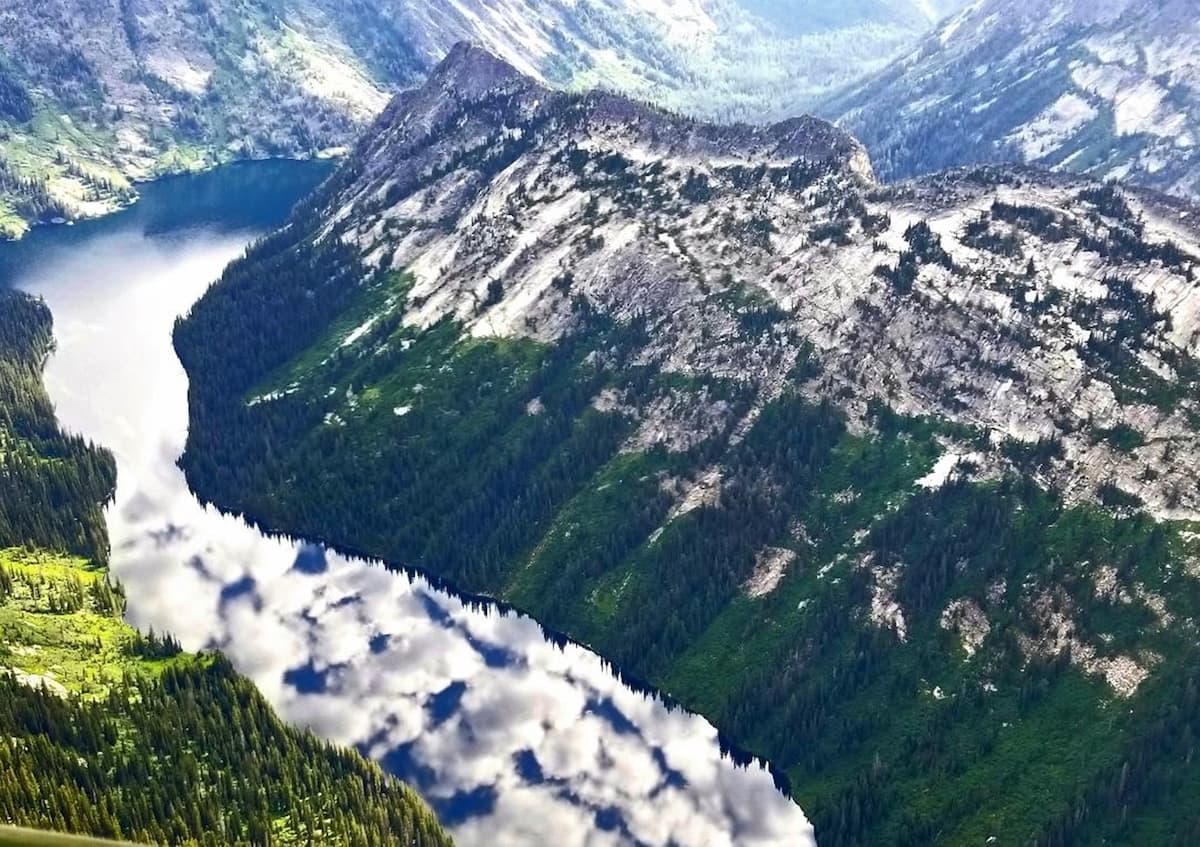
In mountain photography, the presence of a cloud or a fog layer in a canyon behind the focus of your photograph can add a desirable mystical element.
But be aware that any flight near terrain obscured by clouds requires additional situational awareness, planning, and risk-based decision-making skills. At no time should the urgency to capture a perfect shot ever outweigh the safety of flight. No photo is worth risking inadvertent flight into IMC or controlled flight into terrain.
Adjusting your altitude during multiple passes to photograph a subject can produce significantly different results.
For example, when photographing a mountain, flying by at eye level can make the mountain appear to be large and foreboding, but the surrounding terrain is removed from the background. If you are flying by the peak from a higher altitude looking down at more than a 30° angle, the mountain will be less impressive if it is lost in a sea of surrounding terrain.
A typical default angle that usually produces good results is to fly at an altitude slightly higher than eye level and shoot photos down at a 10° to 20° angle.

Mountain photography requires adherence to hard personal limits and some additional knowledge of mountain weather. As a general rule, it is best to simply avoid low-level mountain flying altogether on windy days due to hazardous lee-side downdrafts, rotors, and turbulence.
If the wind at mountaintop level is greater than 10 knots, I recommend never flying lower than 200 to 300 feet above the summit altitude. If the wind speed is more than 20 knots, but less than 30, you might wish to remain higher than 1,000 feet above all mountainous terrain, and only fly on the windward side of any peak.
There are many variables that will factor into your personal altitude and wind limits, such as the shape and scale of terrain, density altitude, your aircraft weight vs. power available, and the availability of an escape route in the event of an emergency.
Always avoid flying in confined terrain like box canyons.
If you need to remain at a higher altitude, you may still be able to capture stunning photos using partial zoom to enlarge the subject in the frame. But be aware that photos are more easily blurred when using zoom and when flying in turbulent air.
As pilots, we have a unique opportunity to capture impressive aerial photos from a highly maneuverable platform if we make the effort to experiment with the concepts of active photography. The rewards require us to identify and evaluate new hazards and consciously accept additional risk as a foremost priority.
There will always be days, locations, and conditions when it is best to forego any attempts at aerial photography.
But when the opportunity is available, you may end up with images worth printing on canvas for your living room, office, or to share as gifts for loved ones.

It only takes a little extra planning, some trial and error, and the conscious application of a few simple techniques to achieve this goal.
Kurt Kleiner earned his pilot certificate in 1988 after 12 years immersed in rock climbing, skydiving, and paragliding. He’s been an active CFI and FAASTeam Representative since 2005 and is employed as a pilot and CFI at a small flight school and skydiving operation in Stevensville, Montana. He recently retired from a career as an aviation manager with federal wildland firefighting agencies with a focus on operations, safety, training, and risk management. He continues to work several weeks each year as an interagency fire airspace coordinator to design and manage TFRs for large fire incidents.